Quantcast
Channel: Android – Java-Phones.com
Viewing all 189 articles
Browse latest View live

How To Root HTC One M9 – Easy Guide

$
0
0

HTC One M9 is a top-notch Android smartphone from HTC that comes with a unique 1.5 GHz Cortex-A53, 2 GB RAM, 5.0 inch AMOLED capacitive touchscreen display, 20 mega pixel rear camera, 3G support, Wi-Fi, GPS and Bluetooth. The device’s back is also curved in shape. The phone was a huge success among smartphone owners and plenty of them have purchased and using it now.

Although HTC One M9 smartphone comes with great features, few people want to experience more with the device by gaining root process. If you are one of them, then this article will help you.

Squabbi, one of the many developers on XDA, recently released a Toolkit for the HTC One M9, which packs a whole lot of features inside a little download. So, in this post, we will have a look at the various features which are packed into the Squabbi’s Toolkit.

The Toolkit is a 2 MB .EXE download file, and doesn’t require any installation. Once you fire up the toolkit, you get notified with the latest ADB / Fastboot drivers, which are available for the HTC One M9. Also, the toolkit automatically connects to the internet, and downloads the SuperSU .ZIP file, and the TWRP Recovery file for your M9.

Download HTC ONE M9 Toolkit


How To Install TWRP On LG G2 VS980 Lollipop

$
0
0

Android Lollipop is finally available for the LG G2 VS980 Verizon which is amazing news for the users who was waiting that update for long time, in that post we will show you how to install TWRP recovery for LG G2 VS980 Verizon on Android Lollipop which will give you more advanced options than the stock recovery to control your phone. Make sure that by following this steps your device warranty will be void.

Good news for LG G2 VS980 Verizon users, bender_007 of XDA has developed a simple Auto rec app that will install TWRP on your device without the need for a PC. The app needs your device to be running on a rooted Lollipop firmware and everything else will be automagically done by the app.

How To Install TWRP Recovery

  • Download the Auto Rec app and install it on your device. Make sure you’ve enabled app installations from Unknown sources from the security settings of the device.
  • Open the app from the app drawer, you’ll see a simple interface as shown in the screenshot below:
  • On initial use, the app will make few backups, so kindly wait until you see a prompt saying the recovery is ready to flash
  • Now simply click on the Flash TWRP button and grant SuperSU permissions when prompted.
  • Once the flashing is completed, you can switch off the device and boot into recovery mode.

Carbon ROM For Xiaomi RedMi 2

$
0
0

Xiaomi RedMi 2 receives a new custom rom Android 4.4.4 KitKat based on original Android Open Source Project (AOSP), thanks to the release of Carbon ROM. The Carbon ROM has been reportedly built from scratch using AOSP source code with top custom tweaks and features borrowed from popular custom ROMs such as CyanogenMod, AOKP and ParanoidAndroid (PA).

Xiaomi Redmi 2 users who wish to install Android 4.4.4 on their devices using Carbon ROM, may follow our step-by-step guide.

carbon
carbon2

The Android 4.4.4 Carbon ROM can be installed on the REdmi 2 using either CWM or TWRP recovery. Follow any method based on the recovery mode installed on your device.

Downloads Required
Android 4.4.4 Carbon ROM
Google Apps (KitKat compatible)

How to Install Android 4.4.4 Carbon ROM via TWRP Recovery

  1. Power off the phone and wait for 5 to 10 seconds until the device shuts down completely.
  2. Now press and hold Volume Up, Volume Down and Power buttons together, until the device boots into Recovery mode.
  3. Perform Wipe data/Factory reset (this will delete all apps and their settings and game progress). To do so, tap on Wipe and scroll down to the bottom of the screen and do a Swipe on “Swipe to factory reset” option.
  4. Tap on install and navigate to the Carbon ROM zip file you copied earlier to your phone’s SD card. Scroll to the bottom of screen and do a swipe on Swipe to confirm flash option to begin installing the firmware.
  5. Repeat the previous step to flash Google apps as well.
  6. Once Google Apps is also installed, select reboot and then tap on System to reboot your device. Your Redmi 2 will restart and it may take about 5 minutes for first boot to complete. So, do not interrupt the process.

Simple Root Samsung Galaxy S6 Edge SM-G925V

$
0
0

Galaxy S6 Edge, the latest Samsung flagship smartphone featuring a 5.1-inch QHD display with 1440 x 2560 resolution and a 16MP autofocus camera. The below guide will assist you in easily rooting your SM-G925V. Rooting enables access to root applications like Titanium Backup, AdBlock, Tasker, etc. and adds the ability to flash custom ROMs. There are couple of ways to root the S6, of which the simplest and quickest one involves ‘pingpongroot’, a 1-click method to root an Android device without requiring a PC.

The PingPongRoot team has now added support to Verizon Galaxy S6 Edge with the build numbers G925VVRU1AOC3 respectively. So, anyone who is curious to root their Verizon Galaxy S6 Edge can follow the below procedure to root their device.

Thanks to a new root utility called PingPong Root from developer idler1984, almost all variants of the Samsung Galaxy S6 and S6 Edge can now be rooted without tripping the KNOX counter.

How To Root

  1. Download and install the pingpongroot_beta5.1.apk on your device.
  2. Open the app, it will automatically install the SuperSU app for you. Tap on Open once the SuperSU is installed, this will activate it.
  3. The SuperSU app will open, then show an error message and exit back to PingPong Root. This is expected, so don’t panic.
  4. Once you’re ready to root your device, tap the “Get root!” button. From here, you’ll see a message that tells you to “Please Wait!!”—take heed to this message and don’t interact with your phone while the root process is running. After about 30 seconds, a message will appear informing you that the process was completed. At this point, reboot your phone as soon as possible.
  5. When you get back up, go ahead and open the SuperSU app that you’ll now find in your app drawer.

Install the ‘Root Checker’ app from Google Play to confirm that your device is rooted.

Now you’re ready to install your favorite apps that require root. Make sure to grant superuser privileges when asked. Enjoy!

How to root Galaxy S6 SM-G920T on Android 5.0.2 G920TUVU1AOCG

$
0
0

Those of you who have installed the Android 5.0.2 Lollipop stock firmware update available for the Galaxy S6 SM-G920T, can now gain root access on their Galaxy smartphones. Rooting a device is essential for removing the OEM restrictions on it, as well as to enable access to third-party apps, custom ROMs, and system tweaks for optimum device performance.

Those who have already updated their T-Mobile S6 to the latest Lollipop official firmware (G920TUVU1AOCG) via OTA or through manual installation, can root the following the step-by-step guide using pingpongroot tool.

Thanks to a new root utility called PingPong Root from developer idler1984, almost all variants of the Samsung Galaxy S6 and S6 Edge can now be rooted without tripping the KNOX counter.

How To Root Samsung Galaxy S6 SM-G920T

  1. Download and install the pingpongroot_beta5.1.apk on your device.
  2. Open the app, it will automatically install the SuperSU app for you. Tap on Open once the SuperSU is installed, this will activate it.
  3. The SuperSU app will open, then show an error message and exit back to PingPong Root. This is expected, so don’t panic.
  4. Once you’re ready to root your device, tap the “Get root!” button. From here, you’ll see a message that tells you to “Please Wait!!”—take heed to this message and don’t interact with your phone while the root process is running. After about 30 seconds, a message will appear informing you that the process was completed. At this point, reboot your phone as soon as possible.
  5. When you get back up, go ahead and open the SuperSU app that you’ll now find in your app drawer.

Galaxy S6 SM-G920T is now rooted on the official Android 5.0.2 Lollipop firmware. It is now possible to install any app that requires root permission.

Alternately, download and install Root Checker app from Google Play Store to confirm the root status of the device.

How To Root Blu Studio 6 LTE Without PC

$
0
0

As stated by many proud Blu Studio 6 LTE users, this method is pretty easy and efficient. All you need to do is to install the root app and press the Root it button and the rest is to sit and relax while the tool waves its magic. So, anyone who is curious to root their Verizon Galaxy S6/S6 Edge can follow the below procedure to root their device.

How To Root Blu Studio 6 LTE Using Kingroot

  • Download and Install KingRoot as Normal apk on your smartphone.
  • Now Open kingroot
  • It will take some time to root the phone.
  • Finish, Now Reboot Your Device and Enjoy Root Rights.

Now your Android Device is Rooted. To check whether your phone is rooted correctly, open Applications Menu, there you will be able to see a new app installed, called KingUser. If this app exist then it means you have successfully rooted your device or You can verify the root by running the Root Checker app.

That’s it peeps, you’ve successfully rooted your Blu Studio 6 LTE with this awesome tool.

Easy Root Method For BLU Studio X Plus

$
0
0

BLU Studio X Plus is one of the best BLU Android Phones and is one of the most sold too. BLU Studio X Plus is a dual sim Android phone and runs on Android 4.4.2 OS.You can upgrade your device to the lastest Android version available and you can do many things that can help you enhance your device performance and this is why you need to learn how to root BLU Studio X Plus.

These are the instructions to root BLU Studio X Plus (running on android 4.4.2) using the KingRoot Application on the mobile itself (no need of computer).

How To Root BLU Studio X Plus Using Kingroot

  • Download and Install KingRoot as Normal apk on your smartphone.
  • Now Open kingroot app
  • It will take some time to root the phone.
  • Finish, Now Reboot Your Device and Enjoy Root Rights.

Now, as your Micromax A106 Unite 2 is Rooted Successfully you might want to verify that your device is rooted or not. For that, Download and install Root Checker Application from the Play Store and verify the root status manually.

Simple Root For BLU Studio G

$
0
0

BLU Studio G is one of the best BLU devices and it’s not long since it was released but peoples are getting more attracted to it then any of the Samsung Android Phones and that proves the quality of this Android phone.The first thing an Android user thinks after buying a device is rooting and I am sure you all must be searching for a tutorial on how to root BLU Studio G and how to gain root access on your BLU Studio G.

How To Root BLU Dash 5.0 Using Kingroot

  • Download and Install KingRoot as Normal apk on your smartphone.
  • Now Open kingroot app
  • It will take some time to root the phone.
  • Finish, Now Reboot Your Device and Enjoy Root Rights.

Now your BLU Studio G has been rooted and once your device reboots you will find KingUser in the app drawer and it means that your Studio G has been rooted. Optional you can Download and install Root Checker Application from the Play Store and verify the root status manually.

So now you know how to root Blu Studio G but if you are having problems rooting your device and have any question to ask feel free to ask in comments and we will be there to help you.


How To Add Themes On Lenovo A6000,A5000,A7000 VibeUI 2.0

$
0
0

Lenovo has lauched the first 4G budget smartphone A6000; the others include A6000 Plus, A7000 and the latest A5000. Apart from featuring decent specs, all Lenovo smartphones run on the proprietary Vibe UI. While the A7000 runs on Android 5.0 Lollipop overlaid with Vibe UI 3.0, the A6000 Plus, A6000 and A500 pack Android 4.4 Kitkat with the same interface.

Tips: How To Enable online themes
First, make sure you have a rooted smartphone.
Install Build.prop Editor on Play Store
Change ro.lenovo.region=row to ro.lenovo.region=prc
Next Add ro.region.code=row
Save and Reboot

How To Root BLU Life One (2015)

$
0
0

BLU Life One (2015) is a low-budget Android smartphone which is having a lot of demand in market. This device has amazing specs. Here, I am going to give step by step tutorial to BLU Life One (2015). This is very easy procedure and there’s no need to unlock the bootloader separately.

Keep the device charged, at least up to 60%. If the device switch’s off during the rooting procedure, it will surely get bricked.

How To Root BLU Life One (2015) Using Kingroot

  • Download and Install KingRoot as Normal apk on your smartphone.
  • Now Open kingroot app
  • It will take some time to root the phone.
  • Finish, Now Reboot Your Device and Enjoy Root Rights.

You are done with rooting your BLU Life One (2015) and once your device reboots you will find KingUser in the app drawer and it means that your Studio G has been rooted. Optional you can Download and install Root Checker Application from the Play Store and verify the root status manually.

So this was a simple guide to root BLU Life One (2015). If you encounter any problems, then feel free to ask about them here.

Port Dolby ATMOS For Android Kitkat

$
0
0

The Lenovo A7000 is the first phone in the world to pack in Dolby’s Atmos surround sound technology. The audio quality is loud, and the clarity of vocals is better than other phones in its category. The Dolby Atmos app allows finer control of certain settings, such as dialogue enhancement, volume leveller and offers preset modes for music, movies, games and voice content.

This is the Dolby Atmos sound effect ported from a Lenovo rom. This should work on all devices (starting from Android 4.3) since it is a software effect. It might conflict with other dolby effects you already installed. Flash the zip, it will edit (not overwrite) your audio_effects.conf.

Warning
Please backup your ROM via cwm/twrp if youn want flashing this file

Dwonload Dolby ATMOS for all android kitkat

credit
worstenbrood

MIUI6 For BLU Studio 5.0 C HD

$
0
0

DISCLAIMER: Neither the author nor the blog will be responsible for bricked devices or violated warranties. Proceed at your own risk. Data loss is possible so please make sure you’re done backing up your phone’s data.

  1. Make sure you have backed up all the data and have a custom recovery ready on your device that’ll be required to complete the flashing process.
  2. Download the MIUI6 ROM file
  3. Put the files downloaded above in the root folder(preferable) of your sd card.
  4. Boot your phone up in recovery mode(Generally using Vol Up+Power Buttons).
  5. In the recovery mode try navigating using the Volume keys and for selection, use the Power key.
  6. Now in the recovery mode, wipe all the data/ Do a factory reset for a clean installation
  7. Now go to “Install zip from sd card” (We mean the external sd card here!).
  8. Select the ROM zip file that you downloaded in the above step and proceed to flash it.
  9. From the recovery menu, Click “Reboot System Now”.
  10. Sit back and relax, You’re home fella!

Guide How To Disable Signature From services.jar

$
0
0

How To Disable Signature Check Using Lucky Patcher
Download Lucky Patcher And Install
Open Lucky Patcher
Tap Toolbox – Patch To Android – Disassemble Signature Manager
Apply And Automatic Reboot

If you dont like using lucky patcher, you can using this tutorial to disable signature with decompile services.jar. here this tutorial:

Decompile services.jar
Open smali\com\android\server\pm\PackageManagerService. smali With Notepad++
Find This Method :
.method static compareSignatures

Delete That Line Until Its End Method :
.method static compareSignatures([Landroid/content/pm/Signature;[Landroid/content/pm/Signature;)I
-
-
-
- Delete Until Its End Method
-
-
-
.end method


And Replace With :
.method static compareSignatures([Landroid/content/pm/Signature;[Landroid/content/pm/Signature;)I
.registers 9

const/4 v0, 0x0

return v0
.end method

Save and recompile

Build.prop ZTE Max V5

$
0
0

# begin build properties
# autogenerated by buildinfo.sh
ro.build.id=KTU84P
ro.build.display.id=N958St_29_CNCommon_V1.31
ro.build.internal.id=N958St_Z0_CN_JSXPH1ID00H131
ro.build.inner.version=N958St_Z0_CN_JSXPH1ID00H131
ro.build.version.incremental=eng.ztemt.20150105.104856
ro.build.version.sdk=19
ro.build.version.codename=REL
ro.build.version.release=4.4.4
ro.build.date=2015? 01? 05? ??? 10:50:50 CST
ro.build.date.utc=1420426250
ro.build.type=user
ro.build.user=ztemt
ro.build.host=swlab-1t189
ro.build.tags=release-keys
ro.product.model=N958St
ro.product.brand=ZTE
ro.product.name=N958St
ro.product.device=N958St
ro.product.board=msm8916
ro.product.cpu.abi=armeabi-v7a
ro.product.cpu.abi2=armeabi
ro.product.manufacturer=ZTE
ro.product.locale.language=zh
ro.product.locale.region=CN
ro.wifi.channels=
ro.board.platform=msm8916
# ro.build.product is obsolete; use ro.product.device
ro.build.product=N958St
# Do not try to parse ro.build.description or .fingerprint
ro.build.description=N958St-user 4.4.4 KTU84P eng.ztemt.20150105.104856 release-keys
ro.build.fingerprint=ZTE/N958St/N958St:4.4.4/KTU84P/eng.ztemt.20150105.104856:user/release-keys
ro.build.characteristics=default
# end build properties
#
# from device/zte/N958St/system.prop
#
#
# system.prop for msm8916
#

#rild.libpath=/system/lib/libreference-ril.so
rild.libpath=/system/vendor/lib/libril-qc-qmi-1.so
rild.libargs=-d /dev/smd0
persist.rild.nitz_plmn=
persist.rild.nitz_long_ons_0=
persist.rild.nitz_long_ons_1=
persist.rild.nitz_long_ons_2=
persist.rild.nitz_long_ons_3=
persist.rild.nitz_short_ons_0=
persist.rild.nitz_short_ons_1=
persist.rild.nitz_short_ons_2=
persist.rild.nitz_short_ons_3=
ril.subscription.types=NV,RUIM
DEVICE_PROVISIONED=1
# Start in cdma mode
ro.telephony.default_network=5
ro.telephony.default_cdma_sub=0

debug.sf.hw=1
debug.egl.hw=1
debug.composition.type=c2d
persist.hwc.mdpcomp.enable=true
debug.mdpcomp.logs=0
dalvik.vm.heapsize=36m
dev.pm.dyn_samplingrate=1
persist.demo.hdmirotationlock=false

#ro.hdmi.enable=true
#tunnel.decode=true
#tunnel.audiovideo.decode=true
#lpa.decode=false
#lpa.use-stagefright=true
#persist.speaker.prot.enable=false

#
# system props for the cne module
#
persist.cne.feature=4

#
# system props for the dpm module
#
persist.dpm.feature=0

#system props for the MM modules
media.stagefright.enable-player=true
media.stagefright.enable-http=true
media.stagefright.enable-aac=true
media.stagefright.enable-qcp=true
media.stagefright.enable-fma2dp=true
media.stagefright.enable-scan=true
mmp.enable.3g2=true
mm.enable.smoothstreaming=true
mm.disable.sec_smoothstreaming=true
media.aac_51_output_enabled=true
#codecs:(PARSER_)AAC AC3 AMR_NB AMR_WB ASF AVI DTS 3GP 3G2 MKV MP2PS MP2TS MP3 OGG QCP WAV FLAC DIVX DIVXHD
mm.enable.qcom_parser=3407743

#
# system props for the data modules
#
ro.use_data_netmgrd=true
persist.data.netmgrd.qos.enable=true

#system props for time-services
persist.timed.enable=true

#
# system prop for opengles version
#
# 196608 is decimal for 0×30000 to report version 3
ro.opengles.version=196608

# System property for cabl
ro.qualcomm.cabl=0

#
# System props for telephony
# System prop to turn on CdmaLTEPhone always
telephony.lteOnCdmaDevice=1
persist.omh.enabled=false

#
# System props for bluetooh
# System prop to turn on hfp client
bluetooth.hfp.client=1

#Simulate sdcard on /data/media
#
persist.fuse_sdcard=false

#
#snapdragon value add features
#
ro.qc.sdk.audio.ssr=false
##fluencetype can be “fluence” or “fluencepro” or “none”
ro.qc.sdk.audio.fluencetype=fluence
persist.audio.fluence.voicecall=true
persist.audio.fluence.voicerec=false
persist.audio.fluence.speaker=true
#Set for msm8916
tunnel.audio.encode = false
#Buffer size in kbytes for compress offload playback
audio.offload.buffer.size.kb=32
persist.factory.mic_number=13
#Enable offload audio video playback by default
av.offload.enable=false
#enable voice path for PCM VoIP by default
use.voice.path.for.pcm.voip=true
#
#System property for FM transmitter
#
ro.fm.transmitter=false
#enable dsp gapless mode by default
audio.offload.gapless.enabled=true

#Audio voice concurrency related flags
voice.playback.conc.disabled=true
voice.record.conc.disabled=true
voice.voip.conc.disabled=true

#Set composition for USB
persist.sys.usb.config=diag,mass_storage,adb

#Set read only default composition for USB
ro.sys.usb.default.config=diag,serial_smd,rmnet_bam,adb

# set max background services
ro.config.max_starting_bg=8

#property to enable user to access Google WFD settings
persist.debug.wfd.enable=1
#propery to enable VDS WFD solution
persist.hwc.enable_vds=1
#propery to enable VDS WFD solution
#property to set wfd wifi direct wps setup defalut type is keypad(0) / pbc(1)
persist.sys.wfd.wpssetup.type=1
#property to set wfd output resolution is 1080P(0) / 720P(1) / 960*540(2) / 800*480(3)
persist.sys.wfd.zte_resolution=2
#property to show wfd sink false(0) / true(1)
persist.sys.wfd.zsink_support=1
#property this is device support wfd 1080p output support(true) not support(false)
persist.sys.wfd.1080p_support=false
ro.min_freq=800000

#PPPOE config enable
ro.config.pppoe_enable=1

persist.radio.multisim.config=dsds

# Added by Song LinHua 2014.08.28 begin
# 1 : restart system
# 3 : restart the related subsystem only
persist.sys.ssr.restart_level=3

# 0: restart the system normally
# 1: restart the system to download mode for dump
persist.sys.ap.restart_level=0

# 1: restart the modem subsystem normally
# 3: restart the system to download mode for dump
gsm.modem.restart_level=3
# Added by Song LinHua 2014.08.28 end

#ril reset modem add by zhanghao
gsm.modem.restart=0

#/* ZTEMT START enable tintless*/
persist.camera.tintless =enable
#/* ZTEMT END */

#add by wifi and bt name
persist.sys.wifi.softapname=ZTE V5 Max
persist.sys.wifi.p2pname=ZTE V5 Max
persist.sys.bluetooth.name=ZTE V5 Max
#device name
ro.config.devicename=ZTE V5 Max
#For SmartFace Window
persist.sys.smartface.type=310

#add property for srlte
persist.radio.sglte.eons_domain=ps

#
# ADDITIONAL_BUILD_PROPERTIES
#
persist.radio.multisim.config=dsds
dalvik.vm.heapgrowthlimit=128m
keyguard.no_require_sim=true
ro.com.android.dataroaming=false
ro.com.android.dateformat=MM-dd-yyyy
ro.config.ringtone=nubia_mile.ogg
ro.config.notification_sound=Jingle.ogg
ro.config.message_sound=magic_bell.ogg
ro.config.alarm_alert=peaceful_wave.ogg
ro.carrier=unknown
ro.vendor.extension_library=/vendor/lib/libqc-opt.so
persist.radio.apm_sim_not_pwdn=1
dalvik.vm.heapstartsize=8m
dalvik.vm.heapsize=256m
dalvik.vm.heaptargetutilization=0.75
dalvik.vm.heapminfree=2m
dalvik.vm.heapmaxfree=8m
persist.sys.logkit.ctrlcode=1
sys.nubia_safe_preset=1
ro.build.rom.internal.id=V2.6.2.1
ro.build.nubia.rom.code=V2.0
ro.build.nubia.rom.name=nubiaUI
ro.build.rom.id=V2.6.0
ro.nubia.haptics.default=30,22,30,22,22,30,38,22,30,22,50,40
persist.factory.receiver_volume=10
persist.factory.loopback_volume=12
ro.setupwizard.mode=OPTIONAL
ro.com.google.gmsversion=4.4.4_r5
ro.com.google.clientidbase=android-zte
ro.com.google.clientidbase.ms=android-zte
ro.com.google.clientidbase.am=android-zte
ro.com.google.clientidbase.gmm=android-zte
ro.com.google.clientidbase.yt=android-zte
ro.ireader.channel=109188
ro.nubia_default_inputmethod=com.baidu.input/.ImeService
persist.sys.power.sound=1
audio.effect.name=srs
audio.offload.disable=1
persist.factory.otg=false
ro.adb.secure=1
persist.factory.nfc=false
persist.sys.image.enhance=n
persist.sys.image.colortmp=n
persist.sys.singlehand=1
ro.build.audio.internal.id=V1.0.13
persist.sys.dalvik.vm.lib=libdvm.so
net.bt.name=Android
dalvik.vm.stack-trace-file=/data/anr/traces.txt
persist.gps.qc_nlp_in_use=1
persist.loc.nlp_name=com.qualcomm.services.location
ro.gps.agps_provider=1
ro.pip.gated=0
persist.radio.calls.on.ims=0
persist.radio.jbims=0
persist.radio.csvt.enabled=false
persist.radio.custom_ecc=1
persist.radio.rat_on=combine
persist.radio.mt_sms_ack=20

#
# Properties to overwrite (Default)
#

# disable “keep SIM alive” in LPM feature
persist.radio.apm_sim_not_pwdn=1

# enable restoring mode_pref when manual select network with rat
persist.radio.restore_mode_pref=1

persist.env.c.phone.matchnum=11

How To Root ZTE Grand X Without PC

$
0
0

Some couple of months ago, I purchased a ZTE Grand X Android smartphone. The smartphone is awesome and imbedded with so many features. It runs Android OS, v4.1 Jelly Bean, 1gb RAM, 4gb in-built memory and etc.

When I purchased the phone, I was unable to use some applications because it has not been rooted. For instance, before you will be able to use any application that is capable of making screenshots on any Android device, you must have root access.

In this post, I want to explain how I was able to root my ZTE Grand X without a computer.

Guide To Root Grand X Using Kingroot Without PC

  • Download and Install KingRoot as Normal apk on your smartphone.
  • Now Open kingroot app
  • click root button. It will take some time to root the phone.
  • Finish, To check whether your device has complete root access or not, download an app called “Root Checker” from Google Play Store.


Easy Root Samsung Galaxy tab N9106 Without PC

$
0
0

The Samsung Galaxy tab N9106 features some great hardware specifications for the price which includes a quad core Snapdragon process, 10 inch HD display, 5 MP rear camera with a 2 MP front facing camera, 2 GB of RAM and so on.Do you just get an Samsung Galaxy tab N9106 and feel like rooting it? Here is a detailed tutorial on how you can get it done without any ado.

Rooting of Samsung Galaxy tab N9106 can easily be done by using KingRoot and then follow the procedure outlined below.

Guide To Root Samsung Galaxy tab N9106 Using Kingroot Without PC

  • Download and Install KingRoot as Normal apk on your smartphone.
  • Now Open kingroot app
  • click root button. It will take some time to root the phone.
  • Finish, To check whether your device has complete root access or not, download an app called “Root Checker” from Google Play Store.

To confirm whether the process was successful or not, download and install Root Checker. You should see something like this:

Build.prop Oppo Mirror 3

$
0
0

The Mirror 3 smartphone features a 4.7-inch display with a resolution of 720 x 1280 pixels and is powered with a 1.2GHz 64-bit Qualcomm Snapdragon 410 quad-core processor. It is coupled with a 1GB RAM. Specially crafted for the Mirror 3, is an ergonomic arc at the back, allowing the mobile phone to fit naturally into the palm of the user’s hand.

The Oppo Mirror 3 is powered by Android 4.4-based Color OS 2.0.1. It sports an 8MP rear camera with Sony IMX179 Backside Illuminated (BSI) sensor, with LED flash and a 5MP front-facing camera.

# begin build oppo properties
# autogenerated by oppo_buildinfo.sh
ro.build.date.Ymd=150324
ro.build.date.ymd=150324
ro.build.date.YmdHM=201503242030
ro.common.soft=MSM_14065
ro.product.model=3006
persist.sys.assert.panic=false
sys.oppo.dump=0
ro.product.device=3006
ro.product.name=3006
ro.build.product=3006
ro.product.name=3006
ro.product.device=3006
ro.build.version.ota=Mirror3EX_11.A.07_INT_007_150324
ro.build.soft.majorversion=
ro.build.display.id=3006_11_150324
ro.build.display.full_id=3006_11_A.07_150324
ro.build.id.hardware=3006_11_
ro.build.soft.version=A.07
ro.xxversion=v0.5
ro.build.kernel.id=3.10.28-G201503242030
sys.foreground_process=android
ro.oppo.version=US
ro.oppo.build.exp=US
persist.sys.oppo.region=US
persist.sys.timezone=America/New_York
ro.build.version.opporom=V2.0.1i
persist.sys.cfu_auto=0
persist.power.useautobrightadj=true
persist.oppo.ctsversion=false
ro.build.oppofingerprint=
persist.radio.multisim.config=dsds
# end build oppo properties
persist.sys.assert.state=false
persist.sys.assert.panic=false
sys.oppo.dump=0
ro.qualcomm.cabl=0
# begin build properties
# autogenerated by buildinfo.sh
ro.build.id=KTU84P
ro.build.display.id=KTU84P release-keys
ro.build.version.incremental=eng.root.20150324
ro.build.version.sdk=19
ro.build.version.codename=REL
ro.build.version.release=4.4.4
ro.build.date=Tue Mar 24 20:30:29 CST 2015
ro.build.date.utc=1427200229
ro.build.type=user
ro.build.user=root
ro.build.host=ubuntu-15-142
ro.build.tags=release-keys
ro.product.model=msm8916_32
ro.product.brand=OPPO
ro.product.name=msm8916_32
ro.product.device=msm8916_32
ro.product.board=msm8916
ro.product.cpu.abi=armeabi-v7a
ro.product.cpu.abi2=armeabi
ro.product.manufacturer=OPPO
ro.product.locale.language=en
ro.product.locale.region=US
ro.wifi.channels=
ro.board.platform=msm8916
# ro.build.product is obsolete; use ro.product.device
# Do not try to parse ro.build.description or .fingerprint
ro.build.description=msm8916_32-user 4.4.4 KTU84P eng.root.20150324 release-keys
ro.build.fingerprint=OPPO/msm8916_32/msm8916_32:4.4.4/KTU84P/eng.root.20150324:user/release-keys
ro.build.characteristics=default
ro.build.version.opporom=V2.0.1
ro.rom.different.version=ColorOSV2.0.0i_150324
# end build properties
#
#
#
#
# begin build oppo properties
# autogenerated by oppo_buildinfo.sh
ro.build.date.Ymd=150324
ro.build.date.ymd=150324
ro.build.date.YmdHM=201503242030
ro.common.soft=MSM_14065
ro.product.model=3006
persist.sys.assert.panic=false
sys.oppo.dump=0
ro.product.device=3006
ro.product.name=3006
ro.build.product=3006
ro.product.name=3006
ro.product.device=3006
ro.build.version.ota=Mirror3EX_11.A.07_INT_007_150324
ro.build.soft.majorversion=
ro.build.display.id=3006_11_150324
ro.build.display.full_id=3006_11_A.07_150324
ro.build.id.hardware=3006_11_
ro.build.soft.version=A.07
ro.xxversion=v0.5
ro.build.kernel.id=3.10.28-G201503242030
sys.foreground_process=android
ro.oppo.version=US
ro.oppo.build.exp=US
persist.sys.oppo.region=US
persist.sys.timezone=America/New_York
ro.build.version.opporom=V2.0.1i
persist.sys.cfu_auto=0
persist.power.useautobrightadj=true
persist.oppo.ctsversion=false
ro.build.oppofingerprint=
persist.radio.multisim.config=dsds
# end build oppo properties
#
# system.prop for msm8916
#

#rild.libpath=/system/lib/libreference-ril.so
rild.libpath=/system/vendor/lib/libril-qc-qmi-1.so
rild.libargs=-d /dev/smd0
persist.rild.nitz_plmn=
persist.rild.nitz_long_ons_0=
persist.rild.nitz_long_ons_1=
persist.rild.nitz_long_ons_2=
persist.rild.nitz_long_ons_3=
persist.rild.nitz_short_ons_0=
persist.rild.nitz_short_ons_1=
persist.rild.nitz_short_ons_2=
persist.rild.nitz_short_ons_3=
ril.subscription.types=NV,RUIM
DEVICE_PROVISIONED=1
# Start in cdma mode
ro.telephony.default_network=5

debug.sf.hw=1
debug.egl.hw=1
debug.composition.type=c2d
persist.hwc.mdpcomp.enable=true
debug.mdpcomp.logs=0
#Enable translucent status bar feature
persist.hwc.ptor.enable=true
dalvik.vm.heapsize=36m
dev.pm.dyn_samplingrate=1
persist.demo.hdmirotationlock=false
debug.sf.gpu_comp_tiling=1

#ro.hdmi.enable=true
#tunnel.decode=true
#tunnel.audiovideo.decode=true
#lpa.decode=false
#lpa.use-stagefright=true
#persist.speaker.prot.enable=false

#
# system props for the cne module
#
persist.cne.feature=1

#
# system props for the dpm module
#

#ifndef VENDOR_EDIT
#LinJie.Xu@Prd.Android.USB, 2014/10/27, Modify for Qcom chen yan provider modify
#persist.dpm.feature=0
#else /* VENDOR_EDIT */
persist.dpm.feature=4
#endif /* VENDOR_EDIT */

#system props for the MM modules
media.stagefright.enable-player=true
media.stagefright.enable-http=true
media.stagefright.enable-aac=true
media.stagefright.enable-qcp=true
media.stagefright.enable-fma2dp=true
media.stagefright.enable-scan=true
media.swhevccodectype=0
media.hwhevccodectype=0
mmp.enable.3g2=true
mm.enable.smoothstreaming=true
mm.disable.sec_smoothstreaming=true
media.aac_51_output_enabled=true
#codecs:(PARSER_)AAC AC3 ASF AVI DTS 3G2 MP2TS QCP FLAC
mm.enable.qcom_parser=168563

#
# system props for the data modules
#
ro.use_data_netmgrd=true
persist.data.netmgrd.qos.enable=true

#system props for time-services
persist.timed.enable=true

#
# system prop for opengles version
#
# 196608 is decimal for 0×30000 to report version 3
ro.opengles.version=196608

# System property for cabl
#ifdnef VENDOR_EDIT
#Xiaori.Yuan@Mobile Phone Software Dept.Driver, 2014/09/02 shutdown cabl
#ro.qualcomm.cabl=2
#else
#ro.qualcomm.cabl=0
#endif

#
# System props for telephony
# System prop to turn on CdmaLTEPhone always
telephony.lteOnCdmaDevice=1
persist.omh.enabled=false

#
# System props for bluetooh
# System prop to turn on hfp client
#ifdef VENDOR_EDIT
#HuiTao@Prd.BasicSrv.BT, 2014/08/06 Modify for Close HFP Client
bluetooth.hfp.client=0
bluetooth.a2dp.sink.enabled=false
#else
#bluetooth.hfp.client=1
#endif

#Simulate sdcard on /data/media
#
persist.fuse_sdcard=true

#
#snapdragon value add features
#
ro.qc.sdk.audio.ssr=false
##fluencetype can be “fluence” or “fluencepro” or “none”
ro.qc.sdk.audio.fluencetype=none
persist.audio.fluence.voicecall=true
persist.audio.fluence.voicerec=false
persist.audio.fluence.speaker=true
#Set for msm8916
tunnel.audio.encode = false
#Buffer size in kbytes for compress offload playback
audio.offload.buffer.size.kb=32
#use VERY_HIGH_QUALITY for audio resampler
af.resampler.quality=4
#Enable offload audio video playback by default
av.offload.enable=false
#enable voice path for PCM VoIP by default
use.voice.path.for.pcm.voip=true
#
#System property for FM transmitter
#
ro.fm.transmitter=false
#enable dsp gapless mode by default
audio.offload.gapless.enabled=true

#Audio voice concurrency related flags
voice.playback.conc.disabled=true
voice.record.conc.disabled=true
voice.voip.conc.disabled=true

#Set composition for USB
#ifndef VENDOR_EDIT
#LinJie.Xu@Prd.Android.USB, 2014/07/29, Remove for we don’t need initialize persist.sys.usb.config
#persist.sys.usb.config=diag,serial_smd,rmnet_bam,adb
#endif /* VENDOR_EDIT */

# set max starting background services
ro.config.max_starting_bg=8

#property to enable user to access Google WFD settings
persist.debug.wfd.enable=1
#propery to enable VDS WFD solution
persist.hwc.enable_vds=1

#property to enable narrow search range for video encoding
vidc.enc.narrow.searchrange=1

#ifdef VENDOR_EDIT
#Xiaori.Yuan@Mobile Phone Software Dept.Driver, 2014/10/11 Add for 14005 performance
sys.hwc.gpu_perf_mode=1
#endif /* VENDOR_EDIT */

#hwui properties
#ro.hwui.texture_cache_size=72
ro.hwui.layer_cache_size=48
ro.hwui.r_buffer_cache_size=8
ro.hwui.path_cache_size=32
ro.hwui.gradient_cache_size=1
ro.hwui.drop_shadow_cache_size=6
ro.hwui.texture_cache_flushrate=0.4
ro.hwui.text_small_cache_width=1024
ro.hwui.text_small_cache_height=1024
ro.hwui.text_large_cache_width=2048
ro.hwui.text_large_cache_height=1024

#
# ADDITIONAL_BUILD_PROPERTIES
#
dalvik.vm.heapminfree=4m
keyguard.no_require_sim=true
ro.com.android.dataroaming=false
ro.com.android.dateformat=MM-dd-yyyy
ro.config.alarm_alert=alarm_005.ogg
ro.config.ringtone=ringtone_001.ogg
ro.config.ringtone_sim2=ringtone_005.ogg
ro.config.notification_sound=notification_001.ogg
ro.config.notification_sim2=notification_009.ogg
ro.carrier=unknown
ro.oppo.theme.version=701
ro.vendor.extension_library=/vendor/lib/libqc-opt.so
persist.radio.apm_sim_not_pwdn=1
ro.setupwizard.mode=OPTIONAL
ro.com.google.gmsversion=4.4_r5
ro.com.google.clientidbase=android-oppo
dalvik.vm.heapstartsize=8m
dalvik.vm.heapgrowthlimit=96m
dalvik.vm.heapsize=256m
dalvik.vm.heaptargetutilization=0.75
dalvik.vm.heapmaxfree=8m
drm.service.enabled=true
persist.sys.dalvik.vm.lib=libdvm.so
net.bt.name=Android
dalvik.vm.stack-trace-file=/data/anr/traces.txt
persist.gps.qc_nlp_in_use=1
persist.loc.nlp_name=com.qualcomm.services.location
ro.gps.agps_provider=1
ro.pip.gated=0

How To Root OPPO Find 7/7a

$
0
0

If you have already purchased the OPPO Find 7/7a smartphone and waiting for the working root method for the device, here is the step by step guide to root the OPPO Find 7/7a Note.

Guide Root OPPO Find 7/7a Without Computer

  1. Download and install Oppo Tools on your device
  2. Run Oppo tools
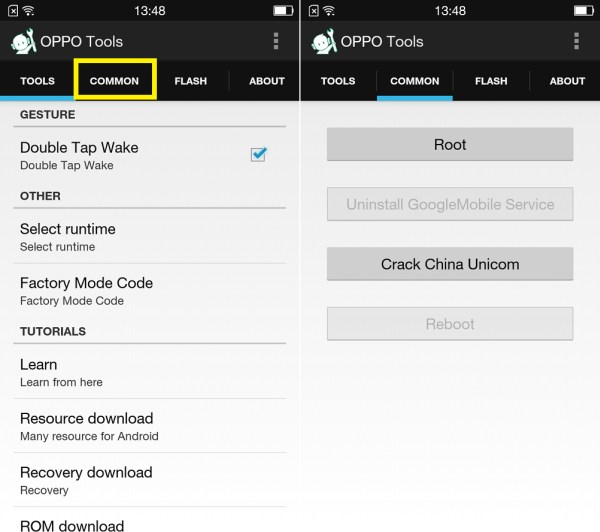
  3. There is some options tab (Tools, Common and Flash), tap at Common
  4. In Common option select Root, Oppo tools will ask you to install OppoToolsPugin application, tap on button to install
  5. After installation, Open it, and click One Key Root
  6. Wait until root process finish

To confirm whether you have successfully rooted your device, open up your Apps Menu and look for the SuperSU app. If the rooting process is successful, you will have this app in your Apps Drawer.

Guide Rooting Oneplus One Without PC

$
0
0

If you got the Oneplus One, you can root it by using of Oppo Root Tools. We have seen a great root tool called the Oppo Root tool for oppo Find7. We’ve already covered how to root your Oppo Find7 with the Oppo Root tool recently, you can find it from below:

Tutorial Root Oneplus One Without Computer

  1. Download and install Oppo Tools on your device
  2. Run Oppo tools
  3. There is some options tab (Tools, Common and Flash), tap at Common
  4. In Common option select Root, Oppo tools will ask you to install OppoToolsPugin application, tap on button to install
  5. After installation, Open it, and click One Key Root
  6. Wait until root process finish

That’s it. Now you have successfully rooted OnePlus One smartphone. To check whether your device is successfully rooted or not, you can use the Root Checker app from Google Play store. Also, if you face any challenges while following this tutorial, do let me know using the comments section below.

Easy Method To Root OPPO N3 Without Computer

$
0
0

Great news for OPPO N3 user who were searching for the working rooting guide, now you can easily root with SuperSU tool which is very popular rooting Android smartphones. Oppo root tool now supports the N3, allowing users to install root, change system partition and use apps that require root permission such as Titanuim backup, Xposed and its modules.

Tutorial Root OPPO N3 Without Computer

  1. Download and install Oppo Tools on your device
  2. Run Oppo tools
  3. There is some options tab (Tools, Common and Flash), tap at Common
  4. In Common option select Root, Oppo tools will ask you to install OppoToolsPugin application, tap on button to install
  5. After installation, Open it, and click One Key Root
  6. Wait until root process finish

IF the root is successful then an app named “SuperSU” will be installed on your phone.
You just rooted your OPPO N3. Any hurdles you faced during the whole walkthrough, let me know in the comments below. And I’ll mind if you don’t share this tutorial with your friends.(Remember sharing is caring!)

Viewing all 189 articles
Browse latest View live